-40%
Rear Forward Cross Bar Frame Repair Kit For 1999-2007 Silverado Sierra 1500 2500
$ 58.07
- Description
- Size Guide
Description
STORE HOMEALL ITEMS
HOT ITEMS
ABOUT US
ADD TO FAVS
FEEDBACK
CONTACT US
WE ACCEPT PAYPAL
Payments only
FREE SHIPPING
& Fast shipping
QUALITY GUARANTEED
ISO/TS16949 certified
1 YEAR WARRANTY
For all products
MONDAY-FRIDAY
8am-5pm(MST)
Who we are:
Tom Auto Parts is a supplier of automotive and light truck parts and accessories at deep discounted prices. We source our products globally buying from OEM and aftermarket manufacturers. We buy in large quantities directly from the factory and pass the savings on to you.
What we do:
We analyze the market to identify the parts in your car that are prone to a high failure rate. We stock only the fastest moving parts purchased directly from the manufacturer and stocked in our state of the art warehouse in Phoenix AZ. A lean and fast moving inventory is another reason we can keep our prices so low.
About Quality:
Low price does not mean low quality. Many of the products we buy come from the OEM manufacturer. Where necessary we make improvements to the original design to correct issues with the original part. All of our products undergo rigorous testing to assure they meet or often exceed OEM quality. All of our parts, be it suspension parts, electrical parts, engine parts, body panels, drivetrain parts are ISO/TS16949 certified by quality manufactures from all across the globe.
COMPATIBLE INFORMATION
Repairing a rusted frame with original equipment usually requires a complete frame replacement. This frame repair kit allows for simpler replacement of just the failed section with heavy-gauge steel.
Cost-effective fix - this chassis frame repair kit allows you to replace a rusted frame section
Improved design - re-engineered with improved drainage to prevent future corrosion buildup
Durably engineered - built with heavy-gauge steel and finished in weldable primer to resist future corrosion
Direct fit - includes all OE hardware mounting positions for complete installation
Fits:
1999-06 Chevrolet Silverado 1500 Rear Forward Frame Repair Kit
2007 Chevrolet Silverado 1500 Classic Rear Forward Frame Repair Kit
1999-04 Chevrolet Silverado 2500 Rear Forward Frame Repair Kit
1999-06 GMC Sierra 1500 Rear Forward Frame Repair Kit
2007 GMC Sierra 1500 Classic Rear Forward Frame Repair Kit
1999-04 GMC Sierra 2500 Rear Forward Frame Repair Kit
Instructions
NOTE
: The photos included show work done on a frame that has been removed from the
body. Although this looks somewhat different than work done on a frame attached to the
truck body, the steps will remain the same.
STEP 1:
Remove the truck bed, safely raise the vehicle off the ground, and suitably
support the vehicle. NOTE: CONSULT THE VEHICLE’S OWNER’S MANUAL OR SHOP
MANUAL TO DETERMINE THE PROPER WAY OF RAISING AND LOWERING YOUR VEHICLE.
STEP 2:
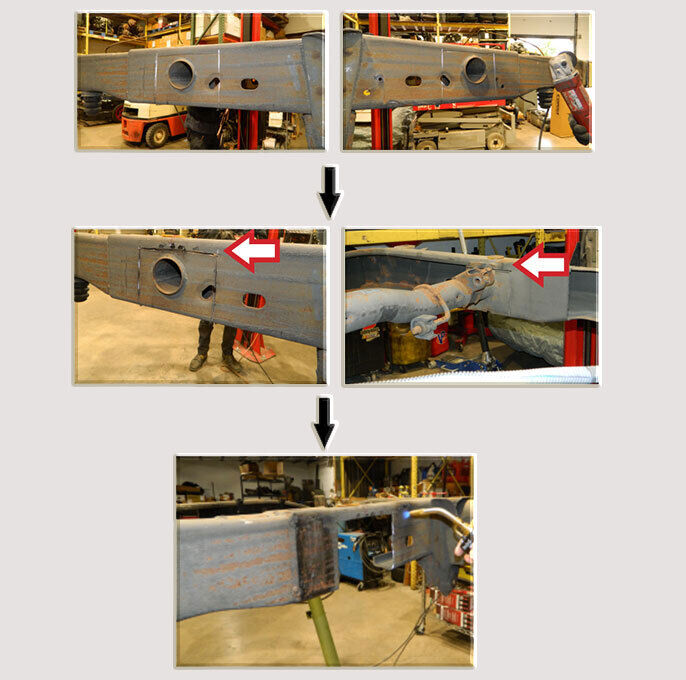
Using a cutting wheel, cut around
the top and sides of the ends of the crossbar
on the frame, on both sides of the frame.
NOTE:
Do not fully cut and remove the
crossbar yet.
STEP 3:
Before completely removing the
crossbar, mark off where the center of the
tube goes with a permanent marker, to
accurately place the replacement tube later.
STEP 4:
Using a cutting wheel, finish cutting
around the bottom and inside of the ends of
the crossbar on the frame, on both sides of
the frame. Once complete, the cut will go up
and over the tube on the outside and inside
of the frame, on both sides of the frame.
NOTE:
Do not cut the frame completely in
half (note that the top of the frame is not cut
in the photos). Make sure the vehicle frame
is properly supported, because the frame
will want to twist or bend when the crossmember is removed.
STEP 5:
Once the cuts are complete, remove
the crossbar from the frame.
STEP 6:
Place the replacement crossbar
in place of the removed one. Hold the
replacement crossbar in place to the frame
with c-clamps or vice grips. Then, using a
permanent marker, mark off the section
of the frame around where the crossbar
attaches to the frame (on both sides
of the frame).
STEP 7:
Remove the replacement crossbar
and the c-clamps or vice grips. Then, using
a handheld torch and paint scraper, clean
down to the bare metal where the crossbar
will attach to the frame, on both sides of the
frame, for a proper and strong weld.
STEP 8:
If necessary, using a flap wheel disc,
sand the outside of the frame to clean
for welding, on both sides of the frame.
STEP 9:
Using c-clamps or vice grips, place
the outer plates to the outside of the frame,
on both sides of the frame.
STEP 10:
Using a welding torch, weld the
outer plate to the outside of the frame on
both sides of the crossbar.
STEP 11:
Hold the tube and inner plates
in place on both sides of the frame. Then,
using a permanent marker, mark off the
section of the frame around the inner plates
(on both sides of the frame), so you can
clean the frame underneath the inner plates
down to the bare metal.
STEP 12:
Remove the tube and inner plates
from the frame. Then, using a flap wheel
disc, sand the inside of the frame to clean
for welding, on both sides of the frame.
STEP 13:
When you are finished, the inside
of the frame on both sides should be clean
as shown.
STEP 14:
Replace the inner plate and tube,
and hold in place using c-clamps
or vice grips.
STEP 15:
Using a welding torch, weld the
inner plate to the inside of the frame, on
both sides of the frame. Then, weld around
the tube to the inner and outer plates, on
both sides of the frame.
STEP 16:
When finished, the weld on the
inner and outer plates and around the tube
should look like the photos shown.
STEP 17:
Once the tube is in place, attach
the included exhaust hanger in the same
location as the OE.
STEP 18:
Be sure to paint all bare metal
surfaces to prevent any rust or corrosion.
STEP 19:
Safely lower the vehicle.
NOTE:
CONSULT THE VEHICLE’S OWNER’S MANUAL
OR SHOP MANUAL TO DETERMINE THE PROPER WAY OF RAISING AND LOWERING
YOUR VEHICLE.
Please be aware that the vehicle compatible chart on eBay is not 100% accurate, but the OE# provided in our listing is correct, If you already have OE number of the parts you are looking for, then you can just searching by OE #.
WARNING: Cancer and Reproductive Harm - www.P65Warnings.ca.gov.
Payment
Delivery details
Terms of sales
About us
Contact us
Payment
WE ACCEPT PAYPAL PAYMENTS ONLY
You can link your Visa, Mastercard, Discover or American Express card to your paypal account and use it to pay what you want,make it quick and safe!
Delivery details
FREE SHIPPING IN THE LOWER 48 STATES
Monday-Friday(excluding weekend and holidays)tracking number will be provided once items are shipped.
Overnight or expedited shipping available upon request.
Free local pick-up.
Please contact us through eBay messaging or call us to schedule your local pickup
Terms of sales
1 YEAR PARTS WARRANTY
No reimbursements will be given for delay,labor,mileage,or any other cost involved in installation or re-installation of the auto parts in question.
Customer is responsible for shipping parts back for inspection and replacement.
We provide part numbers and high resolution pictures.Please check part numbers and pictures for compatibility.
About us
OE QUALITY AND COMPETITIVE PRICE
Many of the products we buy come from the OEM manufacturer. Where necessary we make improvements to the original design to correct issues with the original part. All of our products undergo rigorous testing to assure they meet or often exceed OEM quality. All of our parts, be it suspension parts, electrical parts, engine parts, body panels, drivetrain parts are ISO/TS16949 certified by quality manufactures from all across the globe.
We have a 100% satisfaction goal.If you have had less than 100% positive experience,please contact us so we can work out a resolution.
Contact us
FEEL FREE TO CONTACT US
If there is an issue with shipping or the item you purchased please contact us via ebay message or call us before opening a case or leaving feedback.We will try our best to resolve any kind of issue.
Call our hotline with any questions
Monday-Friday 8am-5pm(MST)
Copyright © Tom Auto Parts. Rights Reserved.
ABOUT US
|
ADD TO FAVS
|
FEEDBACK
|
CONTACT US


